Monday, 26 October 2015

Lava Creature


Lava Creature 

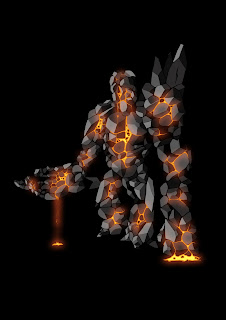
We had to create are own lava monsters for next weeks session.
i started by gathering a few images into a mood-board (shown below).


Ater finding some images i then started to sketch out some ideas of my own.


After I draw three different designs I then picked my favorite one and opened it into Photoshop.  In the end I wasn't happy with the head so I changed it for the head of the Second design I did.


I then filled all thr rocks in with color. 


I thought it was abit to bright so I changed the levels a little. then started to add lava to the creature.


final outcome with lava.


Tuesday, 20 October 2015

Lava Creature workshop.


Visual Design Workshop.


Life Drawing.


Life Drawing

At the start of this session we had to draw the model while he walked around in circle. This turned out to me very hard. I found it hard to get the movement right along with the proportion.


We were told to try out different medias so i tryed a red felt tip pen. i really enjoyed drawing with the pen instead of using chalk. 

drawing done with Black fine point pen.

On this one I used pencil. I was much happier using pencil as I feel I have much more control over the drawing. The angle I had to draw the model was rather hard but I'm very happy with how it turned out. I feel I got the proportions right in this drawing. 

Sunday, 18 October 2015

Robot pixel art.


Pixel Art.

In my visual design workshop I was given the task of creating a robot using the method used to  create pixel art. I found this task a lot harder than I thought I would. Looking at pixel art it seems very simple but to get something to look right and in place can be rather challenging. 


This is the robot I made.


My robot placed into the image given to us in are workshop

Thursday, 15 October 2015

Into The Darkness


Into The Darkness.

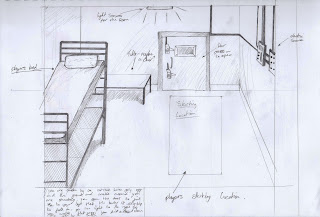
I have to create a two to three minute walking simulator. this was that I have come up with so far.


3D mapped out view of the world war 2 Bunker 

Quick drawing of an idea of how the starting room might look.

This is the one sheet for the game.

Monday, 12 October 2015

Si-Fi Weapon


Si-Fi Weaponry 


I was given the task of creating a si-fi weapon. I first started by doing a few rough sketches in my book. Then I did three more designs using fine liners and some color. After that I picked my favorite  one and scanned it into Photoshop so I could color it.


First sketches in book. 

Three designs with fine liners and color.

I wasn't sure how to color the gun to get a good effect. in the end I blocked in color and then worked into it with some shading.

I'm happy with how this came out as I wasn't sure how to color it from the start. i think this cartoon effect works well but next time I don't think I will keep the black lines in.

Body Proportions


Proportions


We had a lesson on body proportion and were given the task of creating a dwarf and an elf in Photoshop.


(The images on this mood board have been sourced from google images.)

I did this in black and white as I was trying out new brush types and find it easy to get used to them in this medium. 

(The images in this mood board have been scoured from google images.)

For this drawing i used a chalk like brush. I found this very fun and liked making quick strong lines. Doing this made me want to carry on and create more images using this brush type and method.

Wednesday, 7 October 2015

Life Drawing


Life Drawing

These are the outcomes of my life drawing session on the 7th Oct. For some of these drawings we had to listen to music and see how and if it changed the way we used the chalk. 


Tuesday, 6 October 2015

Romanticism


Romanticism


 I have been given the taste of creating this blog about the art movement known as Romanticism. So I'm going to try and find out what is Romanticism and what impact has it had?


 The Romanticism movement lasted from 1770 to 1840. The Romantics as they called themselves announced there appearance in the 1770 self-consciously discarding "Enlightenment values of emotional moderation and neoclassical aesthetics."


 Romanticism was partly a reaction to the Industrial Revelation. It had a deeper understanding of the beauties of nature and more of a emotion attachment than it did an intellectual one. But saying that it was still  an artistic, literary, and intellectual movement. One of the Romantic attitudes towards nature is shown in the work done by John Constable. His landscape paintings of the British countryside were so delicately done the critics at the Salon in Paris embraced his art as "nature itself".


Salisbury Cathedral from the Bishop's Grounds.
 This painting is one of John Constable's done in 1823. It is a painting of one of England's most famous Cathedrals situated in Salisbury.


 This painting to me is very calming. when I look at it I feel like I can feel the calmness and beauty of this Cathedral. what makes me feel this is the stillness of everything, from the cattle grazing and drinking from the still river, to the people slowly walking down the path enjoying the beauty of the landscape around them. I also love how the trees have been painted, John Constable has some how captured the elegant's of them so well that I can almost see the leaves gently swaying in the wind and hear the gentle sound of the leaves rustling. But through all this calmness is a darkened sky slowly moving over the cathedral that could show that there's going to been a storm soon.


File:Caspar David Friedrich 022.jpg


 Caspar David Friedrich.


 After reaching Romanticism it has made me realize how important art moments are in the creation of concepts for games as they could change the concept completely for the better.

Images used in this blog have been scoured from google images.
http://www.britannica.com/art/Romanticism
http://classroom.synonym.com/lasting-impact-romanticism-2217.html


Creating a Column in Maya


Creating A Column In Maya

I had to create this column in my 3D Art Production session on the 5th Oct.

I found this a little challenging but not as hard as creating the barrel that I was given the task of doing in my first session. 


I'm happy with how this turned out as I thought I would of come across a lot more problems while making this.

Creating rocks in Maya


Creating Rocks In Maya

In my 3D Art Production lesson on the 5th Oct i was given the task of creating a rock using the sculpting tools. I was thankful for this as I am planning of creating a lot of rocks and cliff faces for a upcoming project.


These are the outcomes of the rocks.


I applied a rock texture to one of them so I could get an idea of how it might look.


Maya Barrel.


Maya making a Barrel.

For are first lesson using Maya we were given the task of making a barrel. This was my first time ever using Maya or any other 3D software so I found this rather hard. I ended up making at lest 8 barrels before I was happy with the possess involved. 


I had a lot of trouble with the texturing of this barrel. no matter how many times i read the tutorial given to us by the teacher I couldn't seem to do it. The texture I made in Photoshop is not very neat but i made it so i would at lest get a understanding of how texturing works. In the end I got it working by watching a few more tutorials on YouTube.


Life Drawing

Life Drawing

The images below are the outcomes of my second lesson of life drawing. This time we had a male for are study. I'm happy with how these came out. Most of these were done in a few minutes, some 10-15 minutes. My teacher made us draw some of these drawings with are bad drawing hand (my left). I found this very interesting and fun. It makes you really concentrate on what your drawing and what you are looking at rather than draw from your head and what you think the human body should look like, and not whats in front of you. This also meant that when we went back to using are normal hand are drawings felt a lot stronger and gave you more confidence making strong or bold lines.

Quick study's.

These drawings were done with my left hand.

This drawing was fun. I had to draw the outline of the figure in two minutes and then I moved to the right and work on the person next to me while the person from my left worked on my drawing. we did this a few times this this drawing is the outcome of a few people drawing over my quick sketch.   

This was the last drawing of the session. I tried a very box like approach to this drawing.

Silhouettes


Visual Design.

(Images soused from google for the mood board)
We were given the task of creating a mood board of crustaceans and then design three silhouettes, I also added a few more sea creatures to the mood board as I had a few ideas in my head of what they might look good.


These are the three silhouettes I came up with. As you can see at this point i started a add some very quick shading to them. I ended up doing very quick line sketches to show some depth to the silhouettes so that the viewer can get a better understanding of the anatomy of the creatures. Once I was happy with that I then added some color by creating a new layer and changing the layer from a 'normal' to 'color'. This means the color doesn't effect the line drawing underneath and will still show all the detail.


Learning quick shading


Visual Design 


In my Visual Design lesson I was given a Photoshop file to the image above.
the only difference was it was only the outline of the drawing. are task was to follow a written tutorial given to us by the teacher. It taught us how to use different layers and to be confident with using color and shading in a quick fashion. For me this was very important as i have never been very confident using color in my drawings/paintings.